Getting Started: How to Fruit your First Mushroom Block
Colonization of Mushroom Substrate

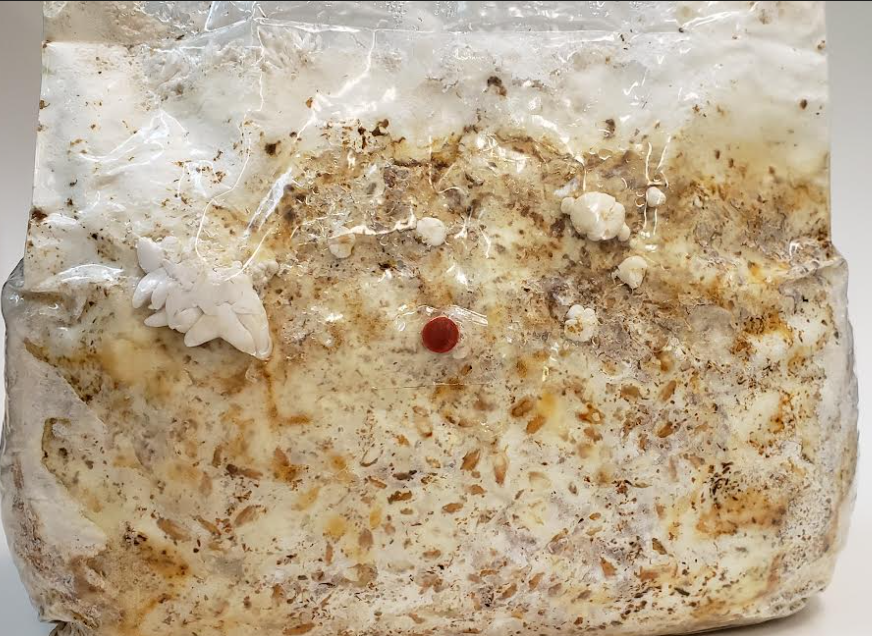
Progression of Grain Colonization
The picture on the right highlights the colonization stage of mycelium, this process will often take 20 – 30 days depending on environmental temperature. Next, we want to identify what is healthy mycelium and what are potential contaminants. Mycelium is easily distinguished by white and stringy (Hyphae), as shown below. Once the substrate is fully colonized it will require the proper environmental triggers to set formation of mushroom formation. Appendix 1 for detailed Growing Scheme.

Pin formations
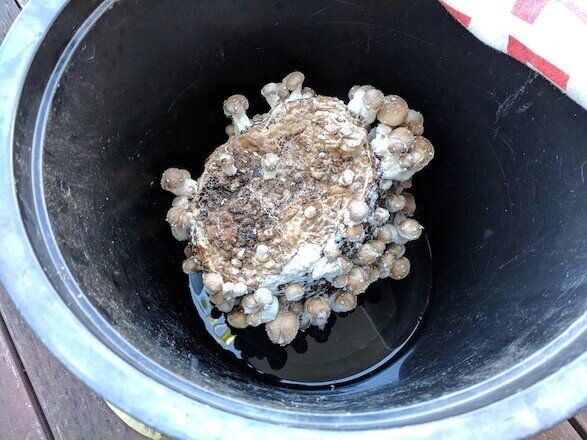
Fully Colonized Grain Bag with Primordial and Pin Formation
After your mushroom grow bag has fully colonized, by turning dense and white. We want to look for and identify primordial and Pin formations. These will look like this picture below, as soon as we exposed the mushroom block to Fresh Air (oxygen) the mushrooms started to take form. You can see on the left of the picture small white pin looking structures, these are primordial/pins.
Ideal fruiting conditions
Many strains of mushroom can tolerate a wide range of temperatures. It’s possible to successfully fruit them when it’s snowing outside and also in temperatures above 30 degrees Celsius. I’ve had success fruiting mushroom in containers in my house during very hot summers where temperatures reach over 40° C outside. I find that mushroom do well in low temperatures, however, they grow a little slower and often produce less but larger mushrooms. In really hot temperatures the mushrooms grow quickly, but you need to be diligent about contaminants.
The main requirement for fruiting mushroom is they need a high humidity environment. This can be achieved using several low-tech methods described below. Unlike other popular gourmet mushrooms (e.g. oysters), mushroom are fairly tolerant of high CO2 environments, so you don’t need a lot of air-flow in conjunction with the high humidity. Refer to end of document for Detailed Grow Scheme.

Budget Friendly Fruiting
Preparing your block for fruiting
Approximately 1 week before you’re ready to eat your mushrooms, give the block a good whack on each side with your hand. You’re aiming to hit it hard, but without breaking it. About the same strength that you’d pat a large dog. This simulates a log falling and shocks the mycelium into reproducing (creating mushrooms).

1. Fruiting in a Bag

A plastic bag is a simple technique of fruiting mushrooms.
The plastic bag will serve as your fruiting chamber. Cut open the top of the bag and either roll the bag on itself leaving ~1-2 inches. Place water in the foil container and cover with the mushroom block with the plastic bag. Throughout the day mist the inside of the plastic bag so visible droplets of water are present. In 2-3 days you should see first pins (baby mushrooms) of small mushrooms forming. Make small holes in the top of the plastic bag to provide additional free air exchange.
Pros: Simple, unlikely to have contamination issues
Cons: Harder to maintain high humidity, if there’s not enough light getting through, mushroom mushrooms can be paler (and will contain less vitamin D).
2. Fruiting in a Bucket
What you’ll need:
· Large bucket
· Brick or anything to elevate the Mushroom Block
· Tea towel
· Hand Mister
Gently cut open the mushroom block, ideally over a sink or outside as there may be residual water may leak. You can either gently rinse the mushroom block exterior or dunk the block in water for 2-5 seconds.
Put a brick inside your bucket and fill the bucket with water so that the water level is a little below the top of the brick. Place your mushroom block on the brick so that it’s above the water and place a tea towel over the bucket. The tea towel helps to keep the humidity up. You can check on it periodically, it usually take 2-3 days for the first pins (baby mushrooms) to start forming.
Place your bucket inside the house or outside in the shade. If the tea towel gets rained on, it will fall in the bucket and ruin the humidity. If there’s too much sun, it will heat the block up and dry it out.
A bucket is a low-tech way of fruiting mushroom
Pros: Simple, unlikely to have contamination issues
Cons: Harder to maintain high humidity, if there’s not enough light getting through, mushroom mushrooms can be paler (and will contain less vitamin D).

3. Fruiting in a Plastic Tub
What you’ll need:
· Large clear plastic storage container
· Hand mister
A plastic storage container will be used as your fruiting vessel. If you don’t have one, you can get them fairly cheaply from hardware and office supply stores. The plastic tub should be as clean as possible before you put your mushroom block in it. Wash it out with hot water and detergent, or use a mix of 70% iso-alcohol, 30% water in a spray bottle to sterilize it and then wipe it down with some clean paper towel.
Once the tub is clean, it’s simply a matter of placing your block in the tub and then opening it once per day to give it some air and a few quick squirts with a hand mister. You can take the lid off the container and use it as a fan to help get some get some oxygen in. I find that this method works better when the weather is warmer, as liquid is less likely to pool in the bottom of the container. The main problem you’ll have with this method is bacterial contamination. The block will continue to exude metabolites (brown liquid) that are susceptible to contamination, especially if the block is sitting directly in them. One way to avoid this is to do the same thing as the bucket method and place a brick in the container with water underneath. The liquid metabolites will disperse into the water and you can dump out this dirty water when you are ready to harvest.
Another method that works quite well is to skewer the blocks on spikes in the container. This keeps the blocks off the bottom of the container and prevents them from sliding around or toppling over. It allows you to arrange the blocks to maximize fruiting space.
Raising mushroom reduces contamination
You can place the container inside or outside, as long as it’s not in direct sunlight. It’s fine to get a bit of morning sun, especially at the end of autumn, winter and the start of spring.
Pros: In my experience, this is the easiest way to get high yielding mushroom crops. The clear container also means that the mushrooms will get some sunlight and contain more vitamin D that you can use for formulating mushroom coffee for focus and memory improvement.
Cons: Can contaminate more easily if tub isn’t clean, wrong time of year, or tub not opened periodically to allow in some fresh air. To make these more efficient we can add holes and fill with Polyfill/Filter material to allow Free Air Exchange (FAE).

Mono-Tub design instructions are provided. We sell assembled Mono-tubs. Battery Mounted Sensor included will helps measure %RH and Temperature in your Fruiting Chamber, allowing you to fine tune your grow like a pro.
Checking in on your mushrooms each day
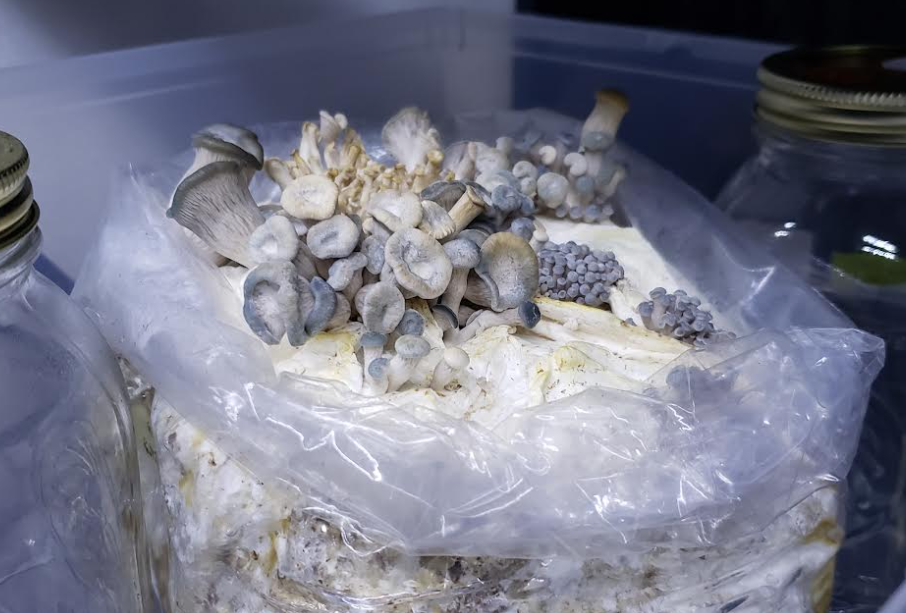
For the first few days, open the fruiting container and give the block a couple of sprays with your hand mister. You want to wet each side of the block if starts to look like it’s drying out. In a few days you’ll see mushroom pins (baby mushrooms). Keep misting the blocks each day for a few more days and then stop misting when the mushroom pins start to look like proper mushrooms. If you mist the block as the mushrooms get larger, they tend to stay wet and have a reduced shelf life after harvesting. Within 7-10 days after placing your block in a container they should be ready for picking. The mushrooms should be doubling in size every day, once they stop growing it’s time to pick them!

Harvesting
Harvesting mushroom mushrooms is fairly easy. I generally harvest all the mushrooms in a single session, unless there are clearly two pin sets at different stages of growth. I’ll get the block, put it on a piece of newspaper and then cut the top mushrooms off the top of it with scissors. After doing this, I’ll turn the block upside down as I find it quicker to harvest the mushrooms from the underside. You can use a knife, or even twist the mushrooms off, I find that twisting them off often rips large chunks of sawdust with it, this means extra clean up. If I’m harvesting for myself, and I’m not going to use the stalks, I’ll just cut the heads off the mushrooms and leave the stalks on the block. No point doing extra cutting in the kitchen!
Second flushes
Most of the time I don’t bother trying to get a second flush of mushrooms from mushroom. This is because the yield will be fairly low if your first flush is large. If your first flush is small, or you want to maximize yields, do the following:
When you’ve picked the mushrooms from your first harvest, leave the block somewhere to dry out that has good airflow (e.g. on a shelf with a rack). You’re trying to prevent the outside of the block from going moldy. After 3-4 weeks the block should be very dry, submerge it water for approximately 12 hours. One way to do this is to fill a bucket with water, submerge the block in it and place bricks or weights on top to hold it under water. The idea is to hydrate the block so that it gets wet, but not so wet that it falls apart. Take the block out of the water, hit it on each side again (not too hard as this time as it doesn’t have the bag to hold it together) and put it back in your fruiting container. Repeat the misting routine, there’s no need to put it in the fridge this time.
Disposing of the block
Your mushroom log is completely organic, you can compost it, bury it. You may hit the jackpot and have garden mushrooms.
Dealing with problems
The two biggest problems you’re likely to face is that your block will go moldy or you won’t get many mushrooms. If your block is going moldy, it’s too wet and potentially doesn’t have enough airflow. If you’re not getting a good yield, it’s likely the block is too dry and you need to increase humidity by misting it more. It takes a little bit of experience to know what looks right, if you’re unsure it’s better to err on the side of keeping the block a bit drier. It’s better to get less mushrooms than no mushrooms at all.

If the mushrooms are starting to look thing and elongated, this is a sign that the mushroom is not receiving enough fresh air, open up the containment vessel throughout the day, mist some water and fan. You want to provide enough Free Air Exchange so the fruiting bodies do not have to search for Oxygen.
Mushrooms are growing perfectly in a bunch on the right; however, there are brown/shriveling mushrooms in the center, this is sign that there is not enough humidity. To combat this misting and air exchange of the Mushroom Block is required